User Manuals
Frequently Asked Questions
Cleaning the meter
a. Be sure to clean the areas around slots and openings, while being careful not to get any moisture in them. You should also wipe down the entire meter surface, including the meter display.
b. Clean the measuring window following the steps as below if you notice that the measuring window located beneath the cover is visibly dirty, or if the error message E-4 or E-5 is displayed.
Cleaning the measuring window
| Steps | Picture | |
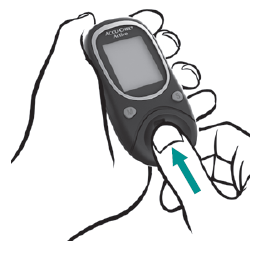
| 1. |
Pull the cover of the measuring window straight towards you. |
|
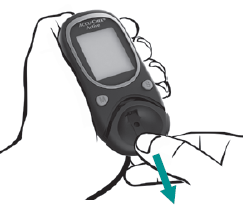
| 2. |
Wipe the cover from the outside and the inside using a lightly moistened cloth or cotton swab. |
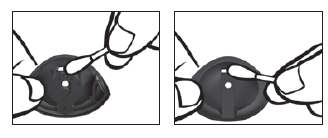 |
| 3. |
Carefully wipe the measuring window and its surrounding area using a lightly moistened cloth or a cotton swab. Remove any fluff or lint that may remain. Allow areas you have wiped time to dry thoroughly. |
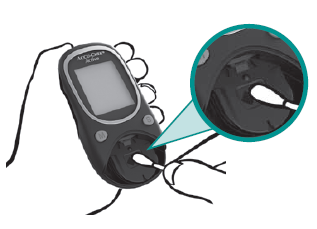 |
| 4. |
Place the cover straight and centered onto the meter. |
 |
| 5. |
Slide it closed until it audibly clicks into place. |
 |
- 70% isopropyl alcohol
- Mild dishwashing liquid mixed with water
- 10% household bleach solution (1 part bleach plus 9 parts water) made the same day
Special Features
| 1. |
With the meter turned off, press the M button. You can also go directly to the saved results after a test. To do so, press the M button while the result is displayed. |
 |
|
2. |
The latest saved result is displayed with the time, date and memory. | 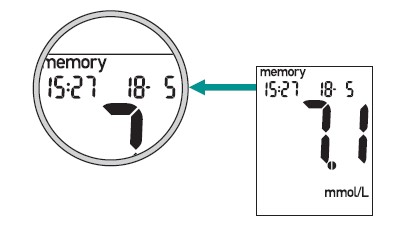 |
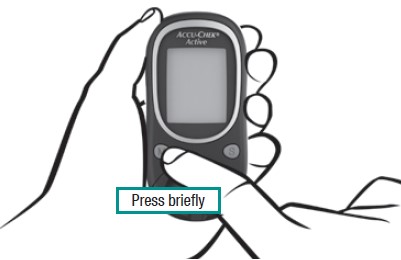
| 3. |
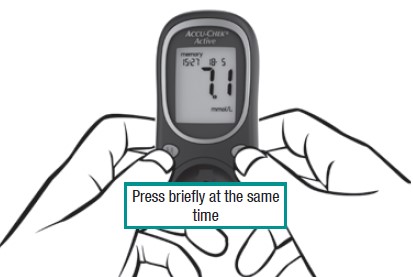
Press the M and S buttons briefly at the same time. |
 |
| 4. |
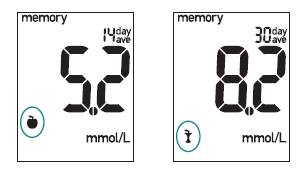
The first average, the 7-day average of all results, is displayed. The number of days taken into account for the calculation of the average is displayed in the upper right corner of the display. |
 |
| 5. |
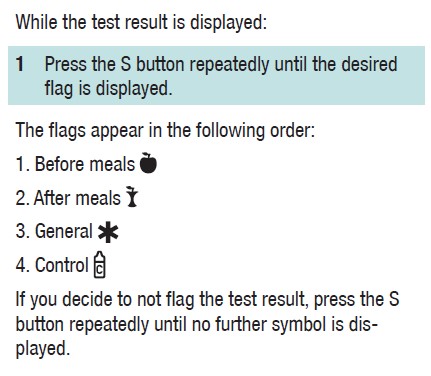
To go the next average: Press the M and S buttons briefly at the same time. The averages are displayed in the order. Averages “before meals” are flagged with |
|
 Averages “after meals” are flagged with
| 1. |
With the meter turned off, press the M button. You can also go directly to the saved results after a test. To do so, press the M button while the result is displayed. |
|
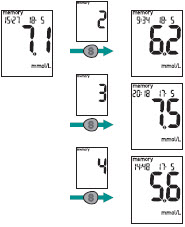
| 2. | The latest saved result is displayed with the time, date and memory. | |
| 3. |
Retrieving older results: Press the S button. While you press the S button, the memory location number is displayed. When you release the button, the corresponding result is displayed. If you keep the S button pressed, the occupied memory locations are displayed in quick succession. Once you release the button, the corresponding result is displayed. After the oldest result in the memory, the latest result is displayed again. |
 |
| 4. |
Turning the meter off again: Press the M button briefly. You can directly switch from the saved results to the test by inserting a test strip into the meter. |
|
No, Accu-Chek Active 3 does not have the general test reminder function.


Blood Glucose Monitoring
No. Accu-Chek Active blood glucose meters are designed exclusively for use with Accu-Chek Active test strips.
No, check the use by date  on the test strip container. Do not use test strips past the use by date.
An Err error message will display on the meter, indicating not enough blood was drawn into the test strip for measurement or blood was applied after the test had started. You should discard the test strip and repeat the blood glucose test.
A full drop of blood is needed (1-2 microlitre).
- Insert your test strip into the meter and it turns on automatically.
- With the strip inside the meter (In-dosing), apply your blood sample to the easy to see green dosing area. A drop of blood is needed. In 5 seconds, your test results will appear in the easy to read display.
- Place the strip into the meter to switch it on. Then, with the strip outside the meter (Out-dosing), apply your blood sample to the easy to see green dosing area. A drop of blood is needed. Place the strip into the meter again within 20 seconds. In 10 seconds, your test results will appear in the easy to read display.