Frequently Asked Questions
Meter Maintenance
| 1 | Open the battery door on the back of the meter by pushing the tab in the direction of the arrow and pulling the door up. | 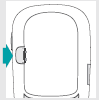 |
| 2 | Remove the old battery. Press and hold the meter button for at least 2 seconds. |  |
| 3 | Slide the new battery under the tab with the (+) side facing up. Put the battery door back in place and snap it closed. |  |
Note:
- The meter uses one 3‑volt lithium battery, coin cell type CR2032. This type of battery can be found in many stores. It is a good idea to have spare batteries available.
- Meter data is not lost when you replace the battery.
Special Features
Follow the steps below to access diabetes management software on a PC. You can use this software to view stored results, set the meter time and date, and change the target range.
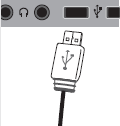
| 1 | Plug the small end of the micro USB cable into the meter. | 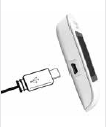 |
| 2 |
Plug the large end of the USB cable into a USB port on the PC. If the meter is off, it turns on. |
 |
| 3 |
Start the diabetes management software and initiate a data transfer. |
|
| 4 |
The meter transfers the data to the software. |
 |
Note:
- Only micro USB cable for data transfer can be used.
- The cable does not charge the meter’s battery. Remove the cable after you have finished.
You can do this by using the Accu-Chek Connect Online data management system. Firstly, you need to connect the meter to a PC using a micro USB cable.
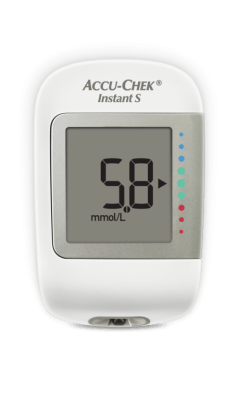
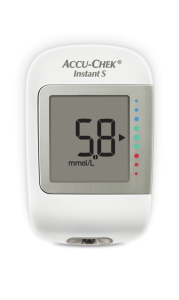
The color codes are known as target range indicator. It gives you visual reassurance if your blood glucose values are:
 Above range (blue)
 Within range (green)
 Or below range (red)
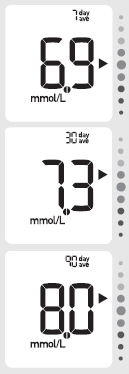
| 1 |
With the meter off, press the meter button to turn the meter on. Press the meter button to view your 7-, 30-, and 90-day averages. |
 |
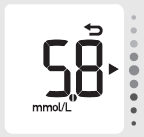
| 1 | With the meter off, press the meter button to turn the meter on. The last test result symbol  indicates that you are viewing your last blood glucose result. indicates that you are viewing your last blood glucose result. |
 |
It can store up to 720 blood glucose results and 30 control tests results with time and date but only your last result is viewable from the meter.
Cleaning the meter
- 70% isopropyl alcohol
- Mild dishwashing liquid mixed with water
- 10% household bleach solution (1 part bleach plus 9 parts water) made the same day
Be sure to clean the areas around slots and openings, while being careful not to get any moisture in them. You should also wipe down the entire meter surface, including the meter display.
Blood Glucose Monitoring
No. Accu-Chek Instant S blood glucose meter is designed exclusively for use with Accu-Chek Instant test strips.
No, check the use by date on the test strip container. Do not use test strips past the use by date.
A E4 error message and Err will alternate on the display, indicating not enough blood was drawn into the test strip for measurement or blood was applied after the test had started. You should discard the test strip and repeat the blood glucose test.